NP127is: Imaging the Skies Over Upstate New York!
We noticed some great Tele Vue-NP127is images on Instagram tagged with our #RPTVO (repost hashtag). They were all taken by Greg Thompson in Tele Vue’s home region of the Hudson Valley, NY. Due to the weather, one has to be persistent to be an astro-imager in these parts. So, we contacted him and that resulted in this guest blog post in two parts. The first part describes his journey into astrophotography and experience imaging with the Tele Vue-NP127is and the second part is a step-by-step guide for image acquisition and processing.
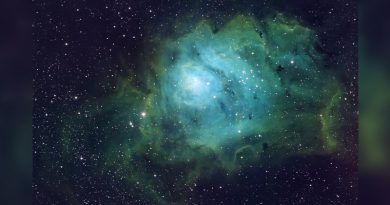
Exposures at ISO 800 and 1600, 174 x 60″/45″ because of wind and low elevation.
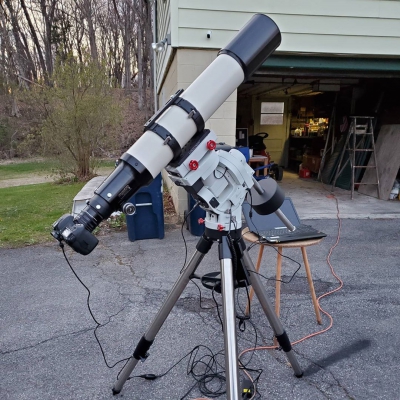
Tele Vue-NP127is APO refractor with Canon EOS 7D Mark II DSLR riding on iOptron CEM60EC mount. Software: BackyardEOS, DeepSkyStacker, StarTools, and Corel Photo-Paint X5.
When I saw the first image of the Orion Nebula on the camera’s LED screen ─ WOW, I was hooked!
As a child, I would always look up at the night sky in hopes of seeing a “shooting star.” I loved the night sky but was never interested in astronomy or cosmology as a young man. I began a photography business in 2011 and had to take early retirement from my day job of 25+ years. My photography led me down many roads, from portraiture and landscapes, birds and wildlife, and many other genres. I had heard of astrophotography but was not interested as I thought it was beyond my reach. Then the television series “How the Universe Works” came to my television in 2016 and could not get enough of it. Soon after, I was browsing a photography forum that I was a member of, and saw some photographs (Deep Sky Objects’s) that a well-known scientist and photometrist had posted using a camera that I already had, and a lens very similar to one of my lenses. That opened my eyes wide and I then began to research everything about astrophotography. Three months later I bought my first camera tracker (Fornax LighTrack II) and accessories to begin my new hobby. That was in the fall of 2016. When I saw the first image of the Orion Nebula on the camera’s LED screen ─ WOW, I was hooked!
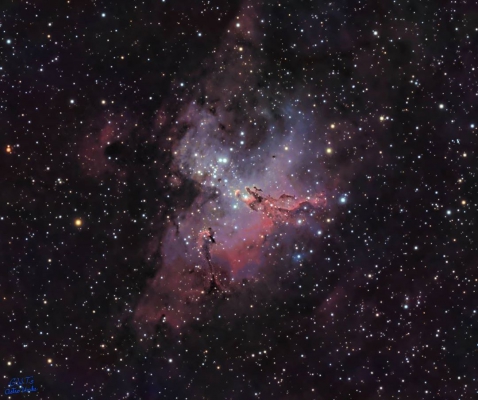
Exposures at ISO 1600, 120″, 90″, and 60″ in bright Moonlight for a total exposure time of 3h:8m.
Tele Vue-NP127is APO refractor with Canon EOS 7D Mark II DSLR riding on iOptron CEM60EC mount. Software: BackyardEOS, PHD2, DeepSkyStacker, StarTools, ON1, and Corel Photo-Paint X5.
I averaged only 1 image per month because of bad weather!
With physical limitations, I am confined to my home property in upstate New York in the Mid-Hudson Valley for astrophotography. My viewing is limited as well because of trees and many power and telephone cables along my property and neighboring properties. I have limited views in the south and virtually no views from southwest to northwest. So I am constantly moving the small tracker rig around to capture objects that might come into view. With the new mount, I am limited to just my driveway at the moment. I will put in a stable brick platform soon for the backyard. I also do not have a lot of time to capture because of these obstacles. Most nights only allow for 1 to 3 hours of imaging time. At Bortle 4, the sky here is quite good in that regard, however, the seeing is usually just fair. Living in a river valley, we have to deal with clouds all the time. In the summer, heavy dew, heat, and humidity (sometimes reaching 95-100%) can be off the charts. During my first two years of doing this, I averaged only 1 image per month because of bad weather!

“The first imaging test with the new Tele Vue-NP127is and iOptron CEM60EC mount was a success. Amazed by the amount of data I did receive with only 1 hour.”
Exposures at ISO 800 and 400, 30 x 120″ lights.
Tele Vue-NP127is APO refractor with Canon EOS 7D Mark II DSLR riding on iOptron CEM60EC mount. Software: BackyardEOS, DeepSkyStacker, StarTools, and Corel Photo-Paint X5.
I decided on the Tele Vue-NP127is. It just fit into everything that I was looking for. Fast, light, outstanding optics, a focal length I was looking for, and the images I was seeing on Astrobin just had a different look to them that set them apart. I was sold!
Even with these limitations, I decided to get my first scope and heavy-duty mount. Being a heavy researcher with anything, I looked long and hard at many scopes. I needed something with fast optics because of the time restraints around my property. I wanted a refractor for my first scope that was light enough for me to handle. I also wanted superior optics and the ability to use it for visual use too. The popular astrophotography hosting site “Astrobin” is probably the best site to look for images created, with the ability to look them up via specific gear. After looking at many, many images, taken by many, many different telescopes, I decided on the Tele Vue-NP127is. It just fit into everything that I was looking for. Fast, light, outstanding optics, a focal length I was looking for, and the images I was seeing on Astrobin just had a different look to them that set them apart. I was sold!
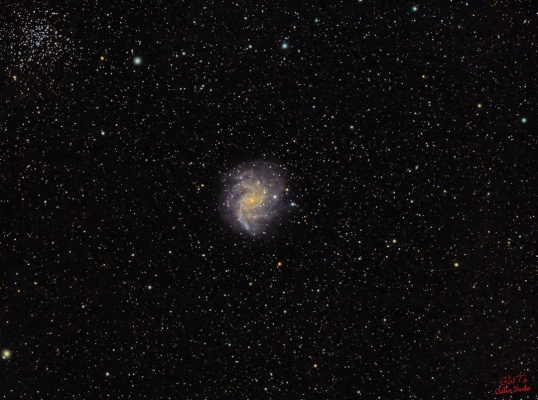
Exposure at ISO 1600 over two nights: 89 x 90″ and 76 x 60″ for a total integration time of 3h:29m:30s.
Tele Vue-NP127is APO refractor with Canon EOS 7D Mark II DSLR riding on iOptron CEM60EC mount. Software: BackyardEOS, DeepSkyStacker, StarTools, and Corel Photo-Paint X5.
The data was so clean and the beautiful galaxies were so clear.
First light with the scope and new mount (iOptron CEM60-EC ) was March 15th of this year after a month of waiting for clear skies (and a 400 pound Black Bear that began showing up at night to leave!). Using the Tele Vue-NP127is visually is just a dream. Looking through the two eyepieces I have (Tele Vue DeLite 18.2mm and Nagler 3.5mm) produced crisp, clear, and clean images of the Moon and larger planets and the Coathanger star cluster was just brilliant! Being pressed for time, I decided to get to imaging and slewed to M 84 which is part of Markarian’s Chain of galaxies. I could only get about an hour of data before trees became an issue but WOW. The data was so clean and the beautiful galaxies were so clear. The data was just so easy to work with. I was totally impressed and continue to be so today.
There are so many wonderful things about this scope that it is hard to say what I like best about it.
There are so many wonderful things about this scope that it is hard to say what I like best about it. But if I had to give just one answer, I would have to say it is the quality of the images it produces. I only wish the weather here would be more cooperative to allow me to get out with it more often. Oh, one more thing. To see this scope mounted up is a sight to behold. It is quite an impressive sight to see. Well, that’s what my friends and family tells me!

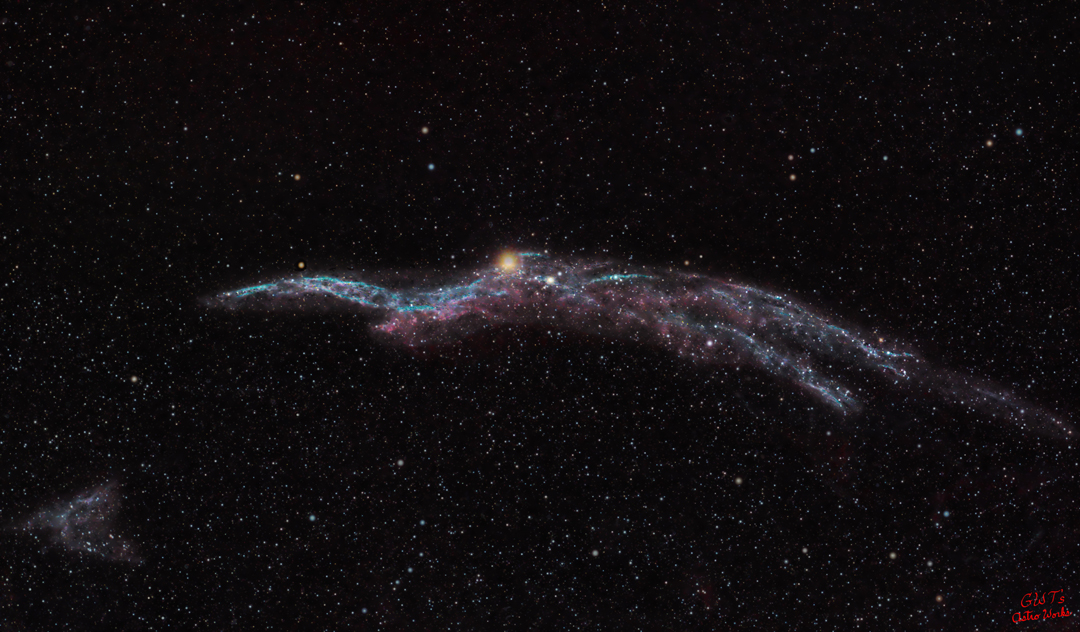
Exposures at ISO 1600, daylight white balance, over two nights. 60″ subframes for a total exposure of 3hr:6m.
Tele Vue-NP127is APO refractor with Canon EOS 7D Mark II DSLR riding on iOptron CEM60EC mount. Software: BackyardEOS, DeepSkyStacker, StarTools, and Corel Photo-Paint X5.
I am currently using Canon Cameras, mostly the Canon 7D Mark II. I also have a Canon 5D Mark III. At some point, I am going to invest in a dedicated cooled astro-camera which will require me to get some new capturing software. For now, the Canons do a fine job. They do produce heavy sensor noise in hot weather, and that is really a big reason wanting to get a cooled camera. That “noise” is really tough to remove in post-processing.

Credit: Gregory Thompson. All rights reserved. Used by permission
I use BackyardEOS for acquisition. It is a really great tool for controlling Canon Cameras and has the ability to control two cameras at the same time which I have done this year. The software just works very well! I save the images to the camera’s CF card. This is much faster (read/write) than saving to the laptop. Remember, time is precious where I am located.
After a night of imaging, the next day is processing time. Images are loaded into a folder on my desktop workhorse, and I use Canon’s own RAW converter/processing/viewing software “Digital Photo Professional” (DPP) to view each RAW frame. Any frames that show any problems like elongated stars, clouds that have wandered in, or the odd tree branch, are deleted. Since obtaining the new mount, those star issues are practically ZERO! But I will admit, I am not the best at processing astro images. It takes years to become “good” at it and I am still learning! The next step is to stack the images.

Credit: Gregory Thompson. All rights reserved. Used by permission
I use Deep Sky Stacker (DSS) to stack the RAW images. It does a nice job of registering, calibrating, aligning, and stacking the images. I almost never use dark, flat, or bias frames as the Canon 7D MII has onboard dark current suppression built into it. I have found that adding dark frames to the stacking process with this camera actually ADDS noise to the stacked images. The Tele Vue-NP127is works so well with the 7D MII, that I do not need to take flats as the scope’s images are well illuminated right up to the edge of the field. There is only a tiny bit of cropping that may have to be done, but that can also be avoided in post-processing with the next step.

Credit: Gregory Thompson. All rights reserved. Used by permission
The next step is to bring in the DSS “tiff” or “fits” file created, and bring that file into StarTools for “stretching” and other dedicated processing. There are so many different types of objects in astrophotography that each one requires a different approach in processing them. I generally do an Auto Develop “stretch” first. This is a histogram stretch. Then a gradient wipe is usually done. Next a manual re-stretch. After these steps, you will have an image that is ready for the finer processing of details of the main object and surrounding stars. Some objects such as Globular Star Clusters require little work while other objects such as Galaxies or Large nebulae may require very long intensive processing. I think the longest processing image to date took me about 18-hours of actual processing time!

Credit: Gregory Thompson. All rights reserved. Used by permission
The stretches shown here are in black and white because StarTools starts you off working with “luminance” (brightness) of the linear data. As long as you have not changed that data in stacking software (a big no-no), then the astro-specific software can work with that data to recreate colors that are scientifically or artistically reproduced.
Credit: SmugMug user Gregory Thompson. All rights reserved. Used by permission.
Any astrophotographer will tell you that whatever software you use, StarTools, PixInsight, Astro Pixel Processor, etc., you should take the image from that software to a final step. That step is using a photo processing package that has “curves and levels” such as Photoshop, Gimp, PS Elements, or the program I have been using for many years Corel. I currently use Corel Photo-Paint X5 for final touches to bring the image to what I think it should look like. These are very fine adjustments because I firmly believe that one should take the image as far as possible in the dedicated astro-program before exporting it to the final post-processing software.
- Find more Tele Vue-NP127is imager posts on this blog
- Tele Vue-NP127is page on our website (mobile version)
- Blog on our large scope visual accessory packages
- The #RPTVO hashtag on Instagram.
- Greg is now on AstroBin.