NP101is: Imaging the Skies over Cambridge
Always on the lookout for great examples of astro-photos made with our gear, we were impressed with Steve Greaves’ collection on AstroBin. Steve, obviously proficient with hardware and software, allowed us to showcase some of his work made with our Tele Vue-NP101is APO refractor in this week’s blog.
Pelican Nebula
Below is one of the most striking images in Steve’s collection: you really have to click and zoom in to appreciate the subtlety within this tapestry of color and texture. From top to bottom, an iridescent, rippling, diffuse, blue cloud embedded with dark globules and sinuous dark veins gives way to mountains of golden-orange wisps and outstretched tendrils.

Early Interest in Astronomy
I became interested in astronomy by watching Sir Patrick Moore on The Sky at Night as a youngster in the ’70s. It was live in those days and always on late at night, so I had to fight with my Mum and Dad to stay up to watch it. Once I started to work, and had a little money, I bought a Tasco 60mm refractor, it was only really any good for the moon, planets, and some bright clusters. But I remember being amazed seeing Saturn for the first time, small, and perfect. I then got on with my life, career, marriage, kids, etc.
I picked the hobby up again in the early 2000s when I bought a 6-inch Celestron NexStar. I used this when I could, I co-founded three start-ups in Cambridge UK over this period so my time was pretty stretched. I realised in 2017 I need to focus more time on my hobby. I had always been impressed by the images that were published in Astronomy magazines and realised that it was possible to produce images close to this quality relatively simply. I say simply when comparing it to the ’80s and ’90s when you had to manually guide and use special film with cooled SLR cameras. I have a friend that used to do this. His success rate was pretty poor for the effort expended.
Elephant’s Trunk Nebula
This stark “Elephant Trunk” appendage, rising up against an aquamarine “sky,” is a concentration of ionized gas and dust inside a much larger region of ionized gas and dust known as IC 1396. At 20-lightyears long, the “Trunk” is the most intriguing of the dense, star-forming globules, containing proto- and young stars, in IC 1396. One group of young stars is at the tip of the “Trunk.” Click the image and enlarge it to see how their strong stellar winds create a void that pierces the globule to let starlight through!

Image Processing Notes
The Sulfur II, Hydrogen-alpha, and Oxygen III (SHO) narrowband filter set used for the nebula images is known as the “Hubble Palette” because of their use on the famous Hubble Space Telescope. Images made through each of these filters represent different areas of ionized gas in the nebula. The images from each filter are assigned a false color channel before being combined. The resulting photo isolates various layers in the nebula and conveys a sense of dimensionality to the object.
Unlike the nebula images taken in the aforementioned Hubble Pallete, color galaxy images are usually composed of broadband images through luminance, red, green, and blue filters for a “natural” look.
Steve explains his approach to image data collecting and processing.
Regarding my approach. I cannot claim to have any secret source, I experiment and I am still experimenting. I do like to go deep as I really enjoy the act of image capture, I don’t feel the need to collect as many objects as possible. I process in PixInsight and I subscribe to Adam Block Studios (PixInsight video lessons) and he has helped a great deal. I pretty much use Weighted Batch Preprocessing (WBPP) to calibrate my images and only revert to manual calibration when there is an issue. I think my calibrated frames are pretty good now.
Broadband is a reasonably formulaic process, apart from deconvolution, noise reduction, and final image processing decisions. Although I think I have got these processes nailed, then I process an image where they fail. The Whirlpool galaxy image, for example, seems intrinsically noisy in areas that have a relatively strong signal. In my latest image, I tried NoiseXTerminator to clean it up after failing with my usual linear approach. It worked well, but only after a permanent stretch was applied. Why, I don’t know. So, lots still to learn.
For narrow-band, I have less of an issue with noise given the integration times I use. However, the final look is very subjective. I usually use SHO and adjust the colour saturation using the saturation tool, curves, and masks in PixInsight. For the Pelican Nebula, I artificially boosted blue using a colour mask and the saturation tool in PixInsight. I still haven’t settled on my final look for SHO.
In general, I think I try to boost colour, contrast, saturation, and sharpness but not so much that the image looks cartoonish. I often think that broadband images look the most natural after a first stretch, just as they emerge from the dark, but I can never leave them at that. I am still learning that less is more.
Whirlpool Galaxy
This magnificent, face-on spiral galaxy image reveals blue star clusters and pinkish star-forming regions along the galaxy’s arms. Dark, cosmic dust lanes — material shed in the stellar winds of giant stars and supernova explosions — can be seen against the spiral arms.

Meet the Tele Vue-NP101is Photo / Visual APO Refractor
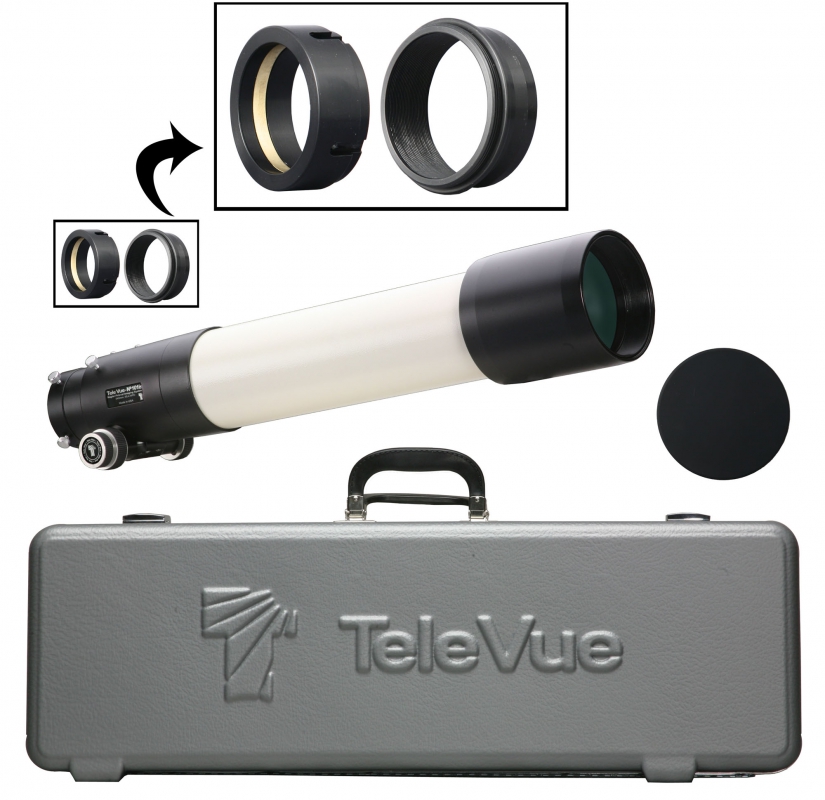
In 1980, Al Nagler took the concept underlying the Petzval portrait lens and applied it to a telescope design creating a fast, flat-field refractor. Its purpose was as a quality control instrument for testing Tele Vue eyepieces (the 5”, f/4 Multi-Purpose Telescope). By 2001, and five generations later, the Tele Vue-NP101 (Nagler-Petzval) was the ultimate culmination of 30-years of design refinement toward optical perfection for Al’s “multi-purpose” concept. However, with the CCD imaging revolution challenging telescope optics beyond anything ever placed at the focal plane, he was determined to make the Tele Vue-NP series telescopes as optically, mechanically, and functionally perfect as possible for imaging as they are for visual observation. The resulting Imaging System version known as the Tele Vue-NP101is retains the 101-mm objective diameter, 540-mm focal length (f/5.4), 4-element in 2-group (Nagler-Petzval) layout, and adds larger rear-group elements and corresponding larger 2.4″ focuser, with built-in tilt compensation, to maximize illumination across even 52mm diagonal chips. The NP101is produces a whopping 5.3° image circle at prime focus. Maximum visual field-of-view is likewise huge: 4.9° with 55-mm Plössl (10x) or 41-mm Panoptic (13x).
All Tele Vue telescopes are built and tested at Tele Vue in Chester, NY and come with a 5-year Limited Warranty.
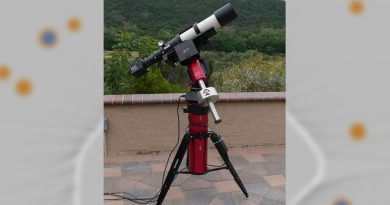
Steve’s Setup
Steve explained how he arrived at his imaging setup.
As soon as I saw it I loved it. I am an engineer and appreciate solid designs and the Tele Vue-NP101is as solid as they come: tube, focuser, and case.
I visited my local telescope dealer which is The Widescreen Centre, they are a Tele Vue dealer, and met the owner Dr. Simon Bennett (FRAS). I explained that I wanted to start imaging and he ran through all my options. He guided me to a wide-field imaging setup to start me off. He showed me a number of telescopes, including the Tele Vue-NP101is. As soon as I saw it I loved it. I am an engineer and appreciate solid designs and the Tele Vue-NP101is as solid as they come: tube, focuser, and case. I looked at online reviews and concluded that was the telescope for me. We paired the OTA with Tele Vue Rings and various eyepieces, a SkyWatcher AZ-EQ6, 60mm guide scope, Feather Touch auto focuser, Starlight Xpress SX814 and Starlight Xpress Maxi Filter Wheel with a set of Astronomik filters.
I now have more time and love my hobby. I want to stay portable as I have a constrained horizon and image both home and away.

North America and Pelican Nebulae
Most posted images of the North America and Pelican Nebulae pair have the continent on the left and Pelican on the right, but here the image is rotated clockwise on its side. “North America” is the intense blue region at the top of the photo with “Florida” surrounded by dark “waters” near the image center. “Mexico and Central America” are across the blackness of the “Gulf of Mexico” from “Florida” The yellowish “Pacific coast waves” abutting the “shore” is known as the “Cygnus Wall” — a dense star-forming region. This level of detail can only be revealed using narrowband filter imaging that highlights differences in the chemical composition of the dust and gasses in the nebula.
The “Pelican” resides at the bottom center of the photo with the “beak” pointing to the upper left corner of the frame. Both nebulae are part of the same ionized cloud of hydrogen gas. It appears as two objects because of an intervening cloud of gas that absorbs the light of the nebula behind it.

We congratulate Steve on his beautiful work and look forward to checking back with him as he images the skies over Cambridge and beyond.

Did you observe, sketch, or image with Tele Vue gear? We’ll like your social media post on that if you tag it #televue and the gear used. Example:
#televue #tvnp101is #M51
Do you want your Tele Vue images re-posted on Tele Vue Optics’ Social Media accounts? Use this hashtag for consideration:
More Info
- Steve’s AstroBin page.
- Tele Vue NP101is photo/visual, Nagler-Petzval (4-element) refractor on website (mobile site).
- Read how Tele Vue designs telescopes on our Tele Vue APO Design and Build “Secrets” blog post.