NP101: Imaging the Skies Over Colorado & New Product!

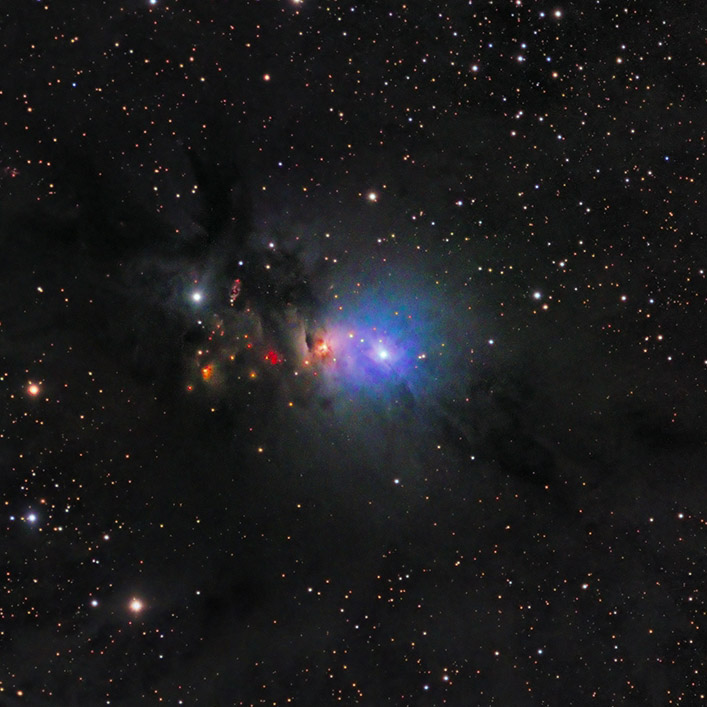
The above portrait of the Horsehead and Flame nebulae is stunning. Created in Hydrogen-alpha light, this monochrome image is filled with wispy tendrils, puffy molecular clouds, dark lanes, and glowing gas. It really brings out the interplay of shockwaves and ionizing radiation at work in this region of the much larger Orion Molecular Cloud Complex.
You can compare this image with the color one below of the same region. The red hues are dramatic, but we lose a sense of the “sculpting” that is taking place in the gas and dust.

The Horsehead (Barnard 33) and Flame Nebulae (NGC 2024) are separated by the bright blue supergiant star Alnitak (center-left in the above image), the easternmost star in the “Belt” of constellation Orion. Like a giant neon sign, the “Flame”, below Alnitak in the image, is “lit up” by ultraviolet light from the star. The flame-like appearance is enhanced by dark “branches” of light-absorbing gas in the nebula. As for the Horsehead, its appearance is due to the three-star system Sigma Orionis “above” the “horse” (bright star along a line through the horse’s neck and head). It causes hydrogen gas to glow behind a dark concentration of dust that has the distinctive appearance of a horse’s head.
All the images on this week’s blog are from Steven Schlagel’s photography page on SmugMug. He has a Deep Space section with many images captured using his Tele Vue-NP101 – “my personal favorite astrophotography telescope”- he tells us.

Steven images under rural Bortel Class 3 skies from his backyard observatory. It’s a SkyShed POD that contains a Software Bisque Paramount ME II mount that carries a Tele Vue-NP101 4″ and Lunt Engineering 152mm telescope. Imaging cameras include the Nikon D810a DSLR and ZWO ASI2600MC cooled color camera with Baader Hα, OIII, and SII filters employed for narrowband imaging. Recently he’s used the Optolong L-eXtreme filter with ZWO color cameras and says “this filter has been a game-changer in imaging with one-shot color and simplifying the process.” PixInsight is his primary image processing program with some touchup in Photoshop. Steve says there is a big learning curve for PixInsight but there are great training programs now available like those from Adam Block.
We asked Steve about his journey into astrophotography and he told us in his own words.
People ask about
what scope they
should buy and I tell
them to avoid the big
scopes and go with
the “101” as it makes
imaging easier and
the quality speaks for
itself. I have no
desire to use another
scope as this one is in
my sweet spot and I
love it.
Like most people, when I started out I thought big was better. So I started with an 8″, worked up to an 11″, 14″ and even a 16″. Along the way, I purchased the Tele Vue-NP101 (4″) and kept finding myself going to that scope for images I could count on. I prefer imaging nebulae and when paired with either a full-frame sensor or crop sensor I can get the right field of view for the nebulae. People that view my images are amazed that the Tele Vue-NP101 can pull that kind of detail on nebulae. I was too at first. Now I’ve sold all the other scopes (other than a 6″ for when I need to go a little deeper.) I’ve had the Tele Vue-NP101 for more years than I can recall and it has been and still is an outstanding performer. People ask about what scope they should buy and I tell them to avoid the big scopes and go with the “101” as it makes imaging easier and the quality speaks for itself. I have no desire to use another scope as this one is in my sweet spot and I love it.
A refractor is easy to
use and a 3″ or 4″
(e.g., Tele Vue-76
and Tele Vue-NP101
— both of which I
have) are great
choices and with the
shorter focal length
are more forgiving
for the beginning
astrophotographer.
It was something like 30-years ago I started dabbling in astrophotography. I saw an image of the Horsehead Nebula and I was hooked. I aspired to one day be able to shoot that image, and I did. What a long learning curve … and what incredible changes in technology occurred since then. Many ask me how to get started and what equipment they need. I tell them the most important single piece is the mount. Get the very best tracking mount you can afford. Then invest in an excellent telescope. A refractor is easy to use and a 3″ or 4″ (e.g., Tele Vue-76 and Tele Vue-NP101 — both of which I have) are great choices and, with the shorter focal length, are more forgiving for the beginning astrophotographer. The camera comes last and the Nikon 810Da or Canon 60a are easy ways to get started (or pick up an astro modified digital camera – a number of good companies making the conversions).
There is a cost to getting started but (I have two grandchildren that have followed in my footsteps that I mentor in astrophotography) one can do it without totally breaking the bank. Most important is to remember that there is a learning curve, and it doesn’t happen overnight. Capturing the images is important, but learning post-processing through PixInsight or Photoshop will take some time too. Find a mentor – and then listen to them! They’ve paid the price to get good and can save you a lot of frustration!

A wonderful Orion Nebula (also M42 or NGC 1976) image follows. This stellar nursery is the most easily visible and closest region of massive star formation to Earth. It displays wisps and folds in the structure shaped by shock waves formed from stellar winds within the nebula’s gas clouds. The red color in the image is from ionized hydrogen that has been excited by giant stars that are being born in the nebula. The outline of a shadowy “Running Man”(Sh2-279) is seen in the nebulosity to the left of M42. This is a smaller region of star formation.

Next is the Helix Nebula (NGC 7293 or Caldwell 63) in Aquarius: the vivid colors of this planetary nebula are the outer layers of a star shed at various times in the past. The energy given off by the dying red giant star at the nebula center causes these layers to fluoresce.

Following is the rose-shaped Rosette Nebula (NGC-2237 or Caldwell 49) – glowing emission nebula and star-forming region. An open star cluster (NGC 2244) resides in the center – it was formed from material in the nebula. In turn, energy pumped out by the cluster excites the hydrogen gas in the nebula to glow. We can see the cluster clearly in the center because massive blue-white stars in the cluster have strong stellar winds that are sweeping dust clear of the area.


The delicate filamentary loops of the Veil nebula were formed by a dying star – about twenty times more massive than the sun. Late in life, it shed an expanding cloud of material before exploding as a supernova 5,000- to 8,000-years ago. The blast from the supernova collided with the prior shed material to form loops of material that have expanded to 3-degrees apart over the millennium. The image shows the Western loop that is also known as the “Witch’s Broom” (NGC 6960 or Caldwell 34). This section is easy to locate bright due to the mag. 4.2 star is 52 Cyg “riding” the broom. The structure that runs across the lower part of the frame is called is known as Pickering’s Triangle (left side) and The Funnel (trailing the triangle).

Nikon F-Mount Wide T Adapter for Tele Vue Imaging System

Nikon cameras are popular with astro-imaging enthusiasts. However, the typical T-ring / telescope setup does not take advantage of the wide aperture of the bayonet mount: significant vignetting is caused by the constriction of the T-ring opening. Our new Nikon F-Mount Wide T Adapter with Bayonet (NWT-2073) connects to Nikon F-mount camera in place of the T-ring and provide 13% greater aperture to minimize vignetting. The other side of this adapter fits our proprietary 2.4″ Imaging System accessories. No additional T-adapter required!
The F-Mount is Nikon’s long-running camera mount that originated on the Nikon F in 1959 and has been used ever since – including on the current Nikon D850. Nikon Z-series mirrorless cameras, employing an F-to-Z adapter (FTZ), can also be used with our NWT-2073.

The NWT-2073 can also be combined with non-Imaging System scopes of any brand by using a Tele Vue Imaging System Nosepiece for 2″ Focuser (RAD-1074). The RAD-1074 slides into a 2″ telescope drawtube and has a 2.4″ Imaging System thread on the other side to accept any Imaging System accessory.
Learn more about our Imaging System focal path accessories on the website (mobile site)
- Steven Schlagel SmugMug page.