From Tom’s Driveway: Tele Vue-NP127is & Tele Vue-85 Simultaneous Imaging!

We noticed some unique images on AstroBin.com employing our Tele Vue-NP127is and Tele Vue-85 scopes to simultaneously image the same target. The images from the two scopes were combined to create the final image — with fantastic results! All the image locations are given as “Tom’s Driveway” in Terre Haute, IN. Intrigued, we contacted the imager (“Astrovetteman”) to learn how he settled on this technique for many of his images. So we turn over our blog this week to astrophotographer Tom Peter and his dual-scope driveway setup.
Early Interest in Astronomy
… Neil Armstrong, Isaac Asimov,
Scott Carpenter, J. Alan Hynek …
I’ve enjoyed astronomy, pretty much, all my life. It all started when I was in 1st grade and was picked to go and watch John Glenn’s Friendship 7 flight on the only black and white TV we had in my 100 year old grade school here in Terre Haute, Indiana. When I was a high school senior, two new high schools were built and the one I went to had a Planetarium constructed with funds from a donation from a local physician who’s son was killed when the property was an airport. I befriended the Planetarium Director and helped with setting up programs and actually got to run the Planetarium instrument (a Spitz A4 Planetarium Projector). In 1973, 17 of us from the Astronomy Class went on the African Eclipse Cruise, seeing the total Solar Eclipse and also getting to meet Neil Armstrong, Isaac Asimov, Scott Carpenter, J. Alan Hynek, and others on the cruise.
First Foray into Astro-Imaging
After I graduated from Indiana State University, I became a pharmaceutical representative, doing that until I retired in 2013. It was then that I got into astrophotography. I had a fork mounted 9.25″ Schmidt-Cassegrain scope that I had sitting in my garage that I occasionally used for visual use and thought that I’d try to do some astrophotography — that didn’t work out too well because it was 15 years old, not computerized, and I knew little about astrophotography. I got on some websites and discussion forums and found out that I needed a new mount and quite a few other things. I bought a CGEM-DX, had it hyper tuned, bought what was needed to hook my DSLR to the now dismounted 9.25″ scope, purchased a guide scope and guide camera, and away I went.
First Images with Tele Vue-85 and Tele Vue-NP127is
… images from my TV-85 were
FAR SUPERIOR …
Early results just weren’t very good, I wanted to do wide field, which the 9.25″ didn’t permit, so I went shopping for a good refractor. I researched what I should get and narrowed it down to about four which were in my price range. I just so happened that the first place I called was Tele Vue and the guy I spoke to just happened to be Al Nagler! He suggested that I purchase a Tele Vue-85 with the 0.8x reducer/flattener, so I did! I bought an ADM side-by-side saddle for my mount and mounted the Tele Vue-85 with my Schmidt-Cassegrain. The images from my Tele Vue-85 were FAR SUPERIOR, so I bought a QHY9M (8.3 megapixel) cooled monochrome CCD camera with a 5 position 2″ filter wheel containing Luminance, Red, Green, Blue, and 7-nm Hydrogen-α (Hα) filters. The images from the Tele Vue-85/QHY9M combo were unbelievable!
I ordered my NP127is … and it was
the BEST purchase I ever made!
Then I started doing more narrowband-filter imaging, but taking the camera off and changing filters became a real hassle, so I decided it was time to get another scope/camera to do dedicated narrowband and luminance to complement the images I was getting with the Tele Vue-85/QHY9M setup. My first choice was the NP127is because of the Tele Vue quality that I’d experienced with the Tele Vue-85. I ordered my NP127is in February 2017 and it was the BEST purchase I ever made! I could not believe how much more I could get with the f/5.2 and the wide field of the scope!! The stars are tack sharp right to the edge of the field with the Large Field Corrector.

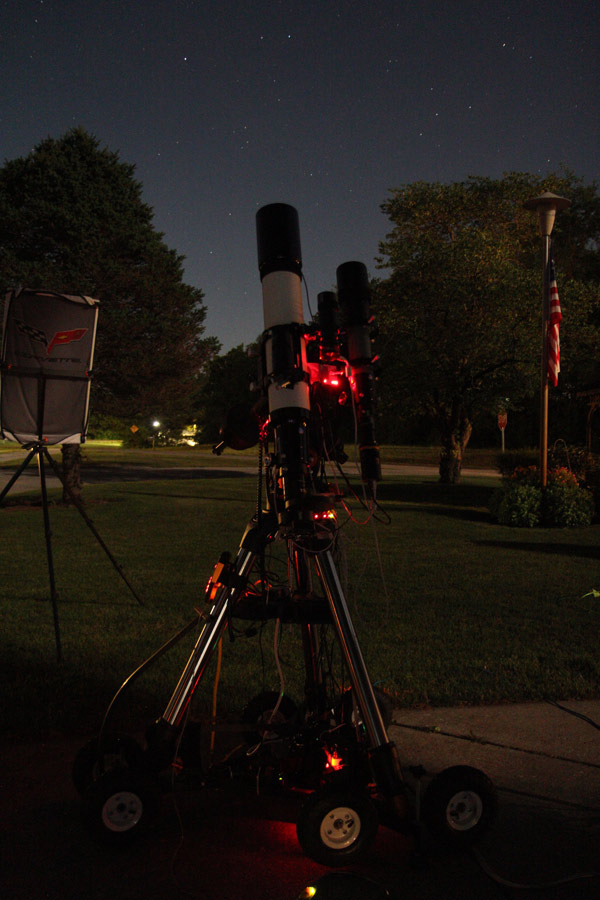
The Schmidt-Cassegrain went into mothballs and now my rig consists of the Tele Vue-NP127is with QHY16200A (16 Megapixel) cooled monochrome CCD camera (employing the following filters: Baader 3.5-nm Hα, Astrodon OIII 3-nm, Astrodon SII 3-nm, Astrodon UV-IR Cut Luminance, and a 7-nm Baader Hβ filter), the Tele Vue-85 with QHY9M (using Baader Luminance, Red, Green, Blue and 7-nm Hα filters). I still use my CGEM-DX with the ADM side-by-side saddle, an Orion Magnificent Mini with a ZWO ASI120MC guider and a QHY Polemaster electronic polar scope. I have the Tele Vue-85 mounted with ADM rings to enable me to align its field of view with that of the NP127is. The entire rig is on JMI wheelie bars (I don’t have a roll off roof observatory) and my telescope is wheeled out of the garage every night.
Using the NP127is for
narrowband images is a true
pleasure!
Using the NP127is for narrowband images is a true pleasure! The imaging train is so solid, I don’t even think about flexure. At f/5.2 and taking 20-minute sub-frames, my images are spectacular! The same is true for my Tele Vue-85 (working at 480-mm, f/5.6 with the 0.8x reducer/flattener) — the Luminance, Red, Green, Blue and 7-nm Hα sub-frames are wonderful!
The Dual Imaging Technique
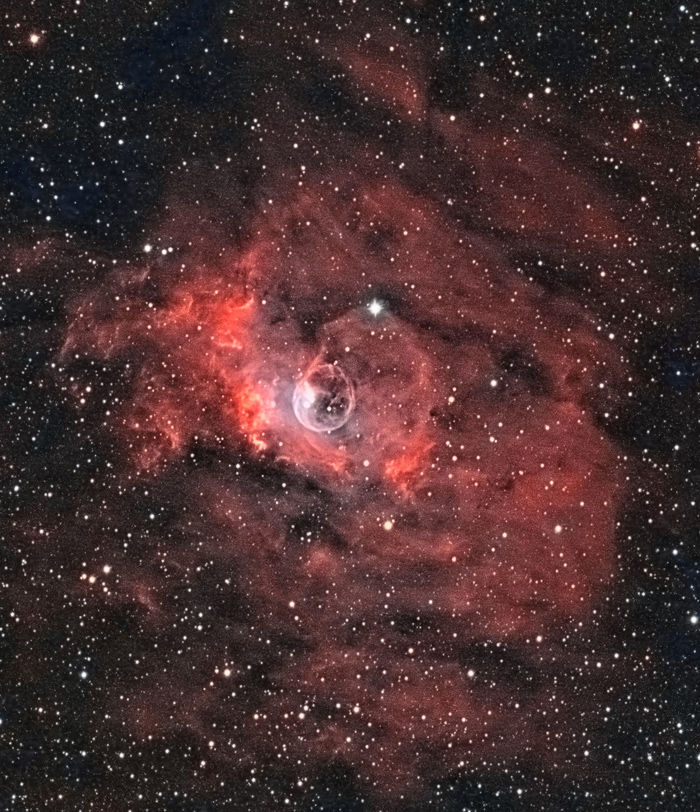
I find that having two scopes/cameras taking images simultaneously has several advantages. One being that you’re getting the same sky conditions for a given set of subs. Another is that both fields-of-view are the same. But the best is that you’re cutting down the time it takes to do a specific project in HALF!! The scope/camera combinations complement each other. The NP127is/QHY16200A (larger sensor: APS-H format using KF16200 chip, 27-mm x 21.6-mm with 6.0-um pixel size) and the Tele Vue-85/QHY9M (smaller sensor using KAF-8300 chip, 17.96-mm x 13.52-mm with 5.4-um pixel size) give relatively the same size field-of-view (the NP127 is slightly larger) so combining images is very easy.
I use Pixinsight to process my data. I take all my narrowband and Luminance with my NP127is and my Red, Green, and Blue with my Tele Vue-85 (however sometimes I will take 7-nm Hα with it and combine that with the 3.5-nm Hα taken with the NP127is). After I have all my Hα, OIII, SII, L, and RGB subs made into masters, I star align each master and linear fit them. I then do a photometric color calibration on the RGB images to get true star color and process the RGB into a nonlinear (to increase contrast) image. After it is processed I extract each channel and set them aside. Then I process the Hα, OIII, SII, and L images from linear to nonlinear. So when I’m done I have 7-nonlinear mono images: Hα, OIII, SII, L, R, G, and B. I like to use the old MultiChannel Synthesis Script in Pixinsight SHO-AIP because I can control the % of each image I put into the final product. I find that if you don’t use some RGB that the star colors just aren’t right so, as an example, for Layer Red I’ll use 60% SII, 40% Hα, and 50% R; for Layer Green I’ll use 30% SII, 30% Hα, 40% OIII, and 50% G; for Layer Blue I’ll use 10% Hα, 90% OIII, and 50% B. This is just an example, I vary the percentages depending on the subject or just how I feel.
The Bottom Line
I LOVE my Tele Vue-NP127is
and my Tele Vue-85!!
The bottom line is: I LOVE my Tele Vue-NP127is and my Tele Vue-85!! The two scopes are the finest quality, the optics are SUPERB, they are ready to use right out of the box, they are relatively lightweight (my CGEM-DX has no problems handling both scopes with PHD RMS guiding software readings usually between .08 and .10), I can take 20-to-30-minute sub-frames with dinner plate round stars all the way to the edges of the field-of-view, focusing with the dual speed rack/pinion focusers is effortless, the imaging trains are ROCK SOLID — they are just a PLEASURE to image with!! I’m SO GLAD I chose to purchase Tele Vue scopes and you’ll be glad too!!
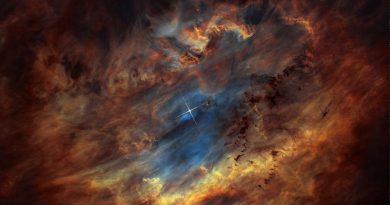
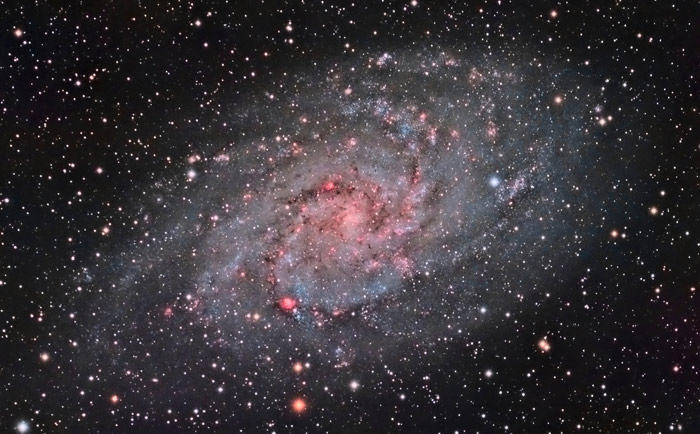
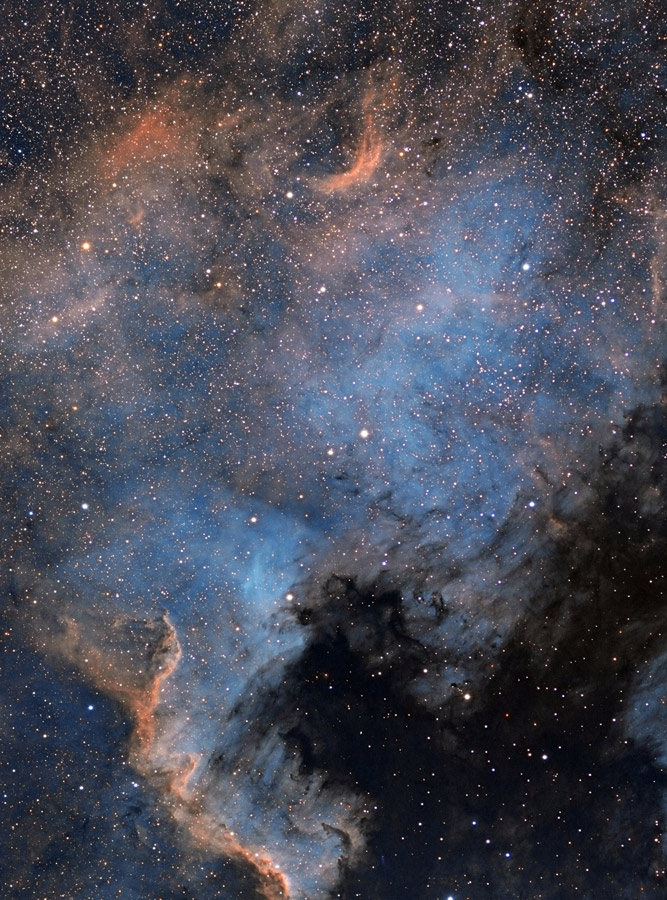
Tom Peter wrote this piece while imaging the Cave Nebula and the Triangulum Galaxy from his driveway in Terre Haute, IN.
- Tom’s account on AstroBin showcases his imaging work.
- Tele Vue-NP127is webpage (mobile site)
- Tele Vue-85 webpage (mobile site)
- More blog posts on the Tele Vue-NP127is
- More blog posts on the Tele Vue-85


Did you observe, sketch, or image with Tele Vue gear? We’ll like your social media post on that if you tag it #televue and the gear used. Example:
#televue #tv85 #ethos #jupiter
Do you want your Tele Vue images re-posted on Tele Vue Optics’ Social Media accounts? Use this hashtag for consideration:
#RPTVO