Tele Vue-85: Imaging Under New York City Light Dome!

Mauri Rosenthal’s Tele Vue 2.5x Powermate solar images appeared in our Here Comes the Sun! blog last December. Imaging from just 10-miles (16-km) from New York City, it was reasonable to expect that his flickr and Instagram walls featured images of the Sun, Moon, and Planets. To our surprise, we also saw some images of deep-sky objects (DSOs), taken with a Tele Vue-85, from the same light-polluted location. We were intrigued at how he was able to get such reasonable results from his poorly situated location and asked if he’d relate his experiences in this blog.
It turns out we’d found the right guy for the job. Mauri wasn’t a “typical” amateur astronomer/imager: he actually teaches Urban Astrophotography in New York City, under the auspices of the Amateur Astronomers Association of New York. His instructor’s biography, on a recent class registration page, describes Mauri’s motivation as follows:
Surprised by the image quality achievable with small telescopes from his yard in Westchester County, Mauri has been developing deep expertise in Ultraportable Urban Astrophotography and is on a mission to use new technology to extend the access of city-dwellers to the wonders of the night sky.
In this guest blog post, we asked Mauri about his overall experience and how Tele Vue Optics contributes to the enjoyment of his hobby.
For new amateurs, the definitions in the following box will help you follow the conversation.

Mauri also uses a Sky Quality Meter (SQM) that returns a value representing the skyglow in units of “magnitudes per square arcsecond” when aimed at the night sky. The brightness scale runs from 22 mag/arcsec2 to 16 mag/arcsec2. The “magnitudes” (mag) in the units relate to stellar magnitudes. For example, a SQM reading of 16 represents the brightness of a 16th magnitude starlight spread over one square arcsecond of sky. As in stellar magnitudes, each whole-number change represents a brightness step of about 2.5x times with lower numbers representing brighter skies. So a SQM reading of 15 is a sky 2.5x brighter than a SQM reading of 16.

Imaging info: Tele Vue-85 with Borg 1.08x flattener and unguided cameras mounted on SkyWatcher Star Adventurer mount. Exposures were 3-hours using ZWO ASI1600 MC color camera with IDAS LPS-V4 (light pollution) filter and 2-hours using QHY163 mono camera with Astronomik Hydrogen-alpha (Hα) filter. Exposure subframes were 4- and 8-second captured as Live Stacks in SharpCap and processed with PixInsight, GIMP, and ACDSee. From my yard 10 miles north of New York City, SQM-L reading 18.5-18.8 (Bortle 7).
Our Q & A with Mauri begins below.
Is Urban Astrophotography really a thing?
Absolutely. If I define it as “White Zone Imaging” current equipment and techniques make it possible to get very decent images of many celestial objects — let’s say the brightest 50% of Messier objects — as long as you can safely set up your gear for a late-night/overnight session. If we define it as “Red and White Zone Imaging” so that we’re including close-in suburbs down to Bortle 7, we can get images today which are indistinguishable from backyard Bortle 4 images (with some exceptions which we can discuss later). Here’s M33 (Triangulum Galaxy) right over my house — technically in the City of Yonkers (4th largest city in New York State) — a few weeks ago:

Monochrome exposure info: Tele Vue-85 with Borg 1.08x flattener and QHY5III174 mono camera all mounted on iOptron CubePro mount. Exposures through Luminance filter with 4-second subframes for 42-minutes total. Dark and flat frames collected in Live Stacks using SharpCap 3.2.
Color exposure info: Tele Vue-85 with Borg 1.08x flattener and ZWO ASI1600MC color camera all mounted on SkyWatcher Star Adventurer mount. Exposure through IDAS LPS-D2 Light Pollution Filter with 4-second subframes for 48 minutes total. Acquired using SharpCap in 8 Live Stacks with dark subtraction.
Is this the greatest M33 image ever? Of course not, it’s not even my best M33. But it’s not bad for about 90-minutes total exposure time, with a highly portable setup. More about the gear later. To be clear though, regardless of what the map says, for astro purposes, I’m in a Bortle 7 suburban Red Zone. I measure sky quality with an SQM-L meter to take some of the subjectivity out of the “urban” claim and this image was taken under an 18.8 or worse sky. I have yet to see a comparable White Zone (e.g. Manhattan) image of M33 though so I’m not sure if it can be done — yet ….
What about a White Zone example, then?
Brighter nebulae are easier than faint galaxies because of the impact of filtering. This Tele Vue-85 image is actually also from my yard, but I’ve imaged M27 (Dumbbell Nebula) from Manhattan with other gear and I’ve seen similar or better images from friends in the city.

Imaging info: Tele Vue-85 with Borg 1.08x flattener and QHY5III178 camera all mounted on iOptron CubePro mount. Exposures of 4-second subframes for a 30-minutes total. Frames collected in Live Stacks using SharpCap3.2. Integrated and processed with PixInsight and finished in ACDSee.
Tell us how you got started with Urban Astrophotography.
I bought myself a Tele Vue-85 for backyard astronomy about 15-years ago. I spoke with Dave Nagler who helped me pick the eyepieces and understand how I’d be using the scope for viewing planets and the moon. Since I had periodically gotten serious about photography since my teens, I had always assumed that I’d try astrophotography at some point — but I really had no time to allocate to film-based imaging, which I knew would be complex and likely pointless from a light-polluted suburb. I did some digiscoping with my early digital cameras, but the other big constraint was managing the physical bulk and complexity of a tracking mount. I could keep the nice-looking Tele Vue-85 on its even more nice-looking walnut tripod in the dining room ready to carry outside, but I simply was not prepared to commit to acquiring, storing, transporting, or using a German Equatorial Mount (GEM). I still haven’t, by the way.

Imaging info: Tele Vue-85 with Borg 1.08x flattener and QHY5III174mono camera all mounted on SkyWatcher Star Adventurer mount. Exposures through ZWO LRGB filters unguided for 4- and 8-second each through the following filters: L=40-min; R=36-min; G=32-min; B= 32-min. Exposures captured in LiveStacks using SharpCap 3.2. Processed with PixInsight. Imaged from my yard 10-miles north of NYC on the night of April 18 (Covid Lockdown week #5), SQM-L reading 18.9/Bortle 7 sky.
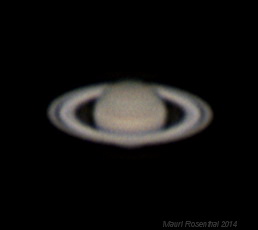
The change came around 2014 when I retired and I’d also acquired a Questar 3.5” scope. The 3.5” Mak is not inherently better for astrophotography than a 3.5” refractor — but it lives on a nice little fork mount that tracks beautifully with minimal fuss and which can even be autoguided. I thought I’d be using this truly portable gear by driving to dark parks or bringing it on vacation trips. But as I tried imaging from my yard, I was constantly surprised by how much I could do just by walking out my back door. Since this is the Tele Vue blog I’ll share this image from that era, a pretty good Saturn for a 90 mm Mak and a Tele Vue 2x Barlow:
I have nice deep sky images from those early years but each one was a big project — a topic for another blog.
So you finally bought a tracking mount for the Tele Vue-85?
Yes and no. I decided to focus on “ultra” portability. To me, a big part of the puzzle for urban dwellers who might want to carry their gear in a backpack to an observing event or use rooftop access is “ultra” portability. I love how solid the Tele Vue-85 feels, it makes me happy to handle it. But, it’s heavy for this purpose. I recall having an impromptu chat on the floor at the Northeast Astronomy Forum with a guy I just met who assured me that a Skywatcher Star Adventurer could handle the weight of the Tele Vue-85 and he showed me a few great images on his phone which proved the case. That’s the combination I used for the M33 image above.

I also can use an iOptron CubePro mount which provides “goto” capability in a compact configuration, but it can only handle the Tele Vue-85 in alt-azimuth mode. It worked well enough for that Dumbbell nebula image above and is a bit easier to work with for Solar imaging with the Tele Vue-85.
Tell us more about Solar.
A couple of years ago I acquired a DayStar Instruments Combo Quark Hydrogen-alpha etalon [an ultra-narrow bandpass solar filter] which can be used with my Questar, Borg, and Tele Vue scopes. Each has its own handling requirements; for the reflector, it’s essential to have an Energy Rejection Filter (ERF) over the objective to protect the scope. For smaller refractors, it’s not essential but DayStar recommends using an ERF with scopes with apertures over 80mm. DayStar also recommends Tele Vue Powermates or other telecentric devices to bring the focal ratio up to 15 or higher for the best performance of the Quark, and they recommend Tele Vue Plössls for best contrast for visual observation. All of this has matched my experience. I recall my first views after acquiring a 2” 2x Powermate, and was thrilled to see prominences and chromosphere detail – when the sun is active it’s pretty exciting compared with static targets.
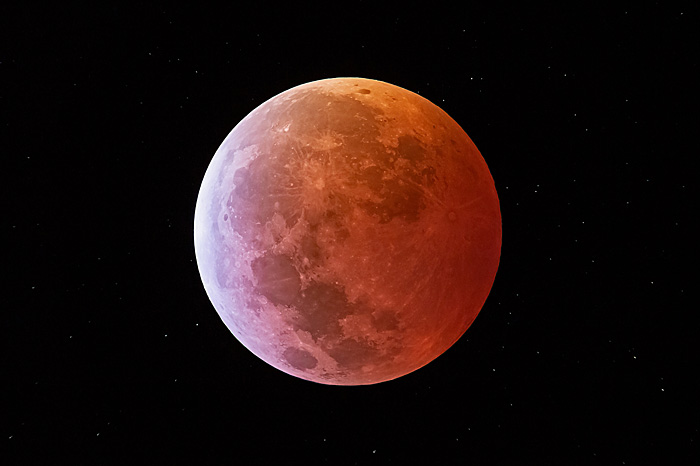
Hydrogen-alpha Solar Imaging is incredibly challenging though — it requires the development of very specific techniques and, among other problems, I’ve struggled using my laptops in bright sunlight. Every session is an experiment of some sort. For now I’ve been focusing my efforts on the Questar/2.5x Powermate combination. Here’s my favorite so far:

I plan to try more with my Tele Vue-85 this spring after the sun climbs higher in the sky — right now I really only have about 45-minutes each day when the Sun clears the local trees and rooftops. I should be able to image a bigger portion of the Sun’s face with this scope and have high expectations for the quality I should be able to get once I nail down a workflow.

Any final thoughts?
When we teach astrophotography with beginners, people come with two orientations. Some say, “I want to try astrophotography so please tell me what telescope I need” and others say, “I have XYZ scope. Tell me how to use it for astrophotography .” I personally came from the latter group and I like emphasizing that the answer to this question in 2021 is very different from what you might have learned before 2015. CMOS cameras, dual-band filters, and improved computing power have made it easier than ever to get decent images, even from light-polluted locations. You need to track and you’ll likely benefit from a new camera. But, I think there may be a lot of Tele Vue-85 owners out there who might be surprised by the additional vistas which can be opened to these beloved scopes by adding these capabilities.

With an 85-mm APO (Doublet) objective and 600-mm focal length, this f/7 refractor offers a combination of optical performance and airline portability that delights amateur astronomers, birders, and reviewers alike. Sky & Telescope reported resolving close double-stars, viewing lunar detail, viewing deep-sky, and photographic uses were: “Truly awesome! …Incredible!…the view almost blew me off my chair!…” The conclusion, “…an extremely powerful, compact instrument capable of delivering stunning images of the universe.”
The maximum visual field-of-view is 4.4° (with our 41 -mm Panoptic [mobile site] at 14.6x or 55-mm Plössl [mobile site] at 10.8x) allows use as a self-finder. Optional Nagler 3-6mm Planetary Zoom [mobile site] yields 100x – 200x in this scope for obtaining optimal planetary observing power to match the seeing conditions.

The addition of the TRF-2008 0.8x Reducer/Flattener (mobile site) converts the Tele Vue-85 to 480mm f/5.6 for flat-field, fast astrophotography with any APS-C camera that accepts a T-Ring.
- Mauri’s images from Westchester County and New York City can be found here on Flickr and Instagram.
- You can find information on Urban Astrophotography and other classes on the AAA.org website. (If Urban Astrophotography not currently listed, see the Fall 2020 course info here).
- Mauri writes periodically about imaging for Eyepiece, the newsletter of AAA, and SkyWAAtch, the newsletter for Westchester Amateur Astronomers.